I would like this blog to be about more than just nice military MOCs we spot on the internet, so every once in a while I'll bore you with something a bit more 'editorial'. This time I'd like to share my thoughts and some tips and tricks on building convincing camouflage for LEGO vehicles, helicopters and aircraft.
What is camouflage?According to
the free dictionary camouflage is:
The method or result of concealing personnel or equipment from an enemy by making them appear to be part of the natural surroundings.
There are two main ways in which this is done: by giving it a colour or colours that match those of the surroundings and by using those colours such that its contours are obscured. Examples of the former are painting a tank that is used in a desert in tan or painting an air superiority fighter in a more-or-less uniform grey. For LEGO building this is fairly easy, although it may be hard to find all the parts you need in a single colour! However, if the surroundings have multiple different colours or you expect to use your vehicle in different surroundings, painting a vehicle in a single uniform colour may not be the most effective. A forest, for instance, tends to have different greens and browns that are lighter and darker depending on how dense the foliage is in any given spot. Having a uniformly green APC standing in front of it might make it stand out rather than blend in, because of the straight lines that form its edges and a general absence of straight edges in a real forest. The various coloured patches on the vehicle should obscure the vehicle's contours. Check out these pictures of real-world camouflage.

A US Marine corps AAV-7 amphibious tractor
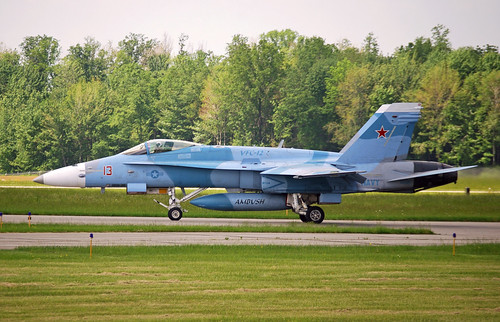
A US Navy F/A-18C Hornet painted to represent a Russian Su-27 'Flanker'
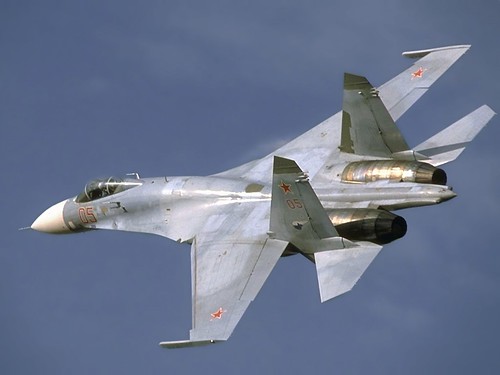
An actual Russian Su-27 'Flanker'
Recreating this effect in a LEGO model might seem easy. After all, building something in lots of colours has the wonderful advantage that if you don't have a particular part in one colour, you can easily use another. However, simply taking a few piles of parts in a number of colours and picking the parts you need at random isn't going to produce a very convincing result. You see, camouflage isn't random. In order to have a vehicle blend into the background, different colours are used in a few fairly large patches rather than in lots of small ones. The size of the patches and how jagged the demarcations between the colours are have to be matched to what the background looks like from a range of distances. In the real world this is increasingly done using mathematics, (
fractal geometry in particular), but that may be a bridge too far for the purpose of this blog post. So, how can you build multi-coloured camouflage in LEGO?
Limit the number of colours to four at mostThe first step in recreating this sort of effect in LEGO is choosing the colours. Back when I was a child, LEGO used to come in black, white, grey, red, yellow and blue -not enough for decent camouflage. The range of colours in which LEGO makes parts has been greatly expanded, but there still aren't all that many colours that work well for a realistic colour scheme. In my opinion, a convincing camouflage scheme shouldn't have more than three or four different colours. Of course, if you are modelling a real vehicle, your colours are determined by those of the real vehicle. Regular green is very bright. There is a decent collection of parts in sand green as well, but the colour does look quite pale. Brown and reddish brown are pretty good and there's a fairly wide range of tan parts available. Dark green is better, but you can only get a very limited range of parts. Dark tan is really nice, but still a bit limiting. Part availability in various greys and in black is very good. For aircraft models, colours such as medium blue and sand blue can also be handy, but they are also not easily available in large quantities.
Don't use colours that contrast too much Most real-world camouflage schemes do not mix very light or pale colours with dark ones, simply because most background don't either. An exception would be snow camouflage, which sometimes mixes dark green and white.
Fairly pale colours such as tan, sand green and light grey go reasonably well together. Similarly, black, dark green, brown and dark grey go well together. Leave out the dark grey and you've got something very close to a standard vehicle camouflage scheme on the AAV-7 above.
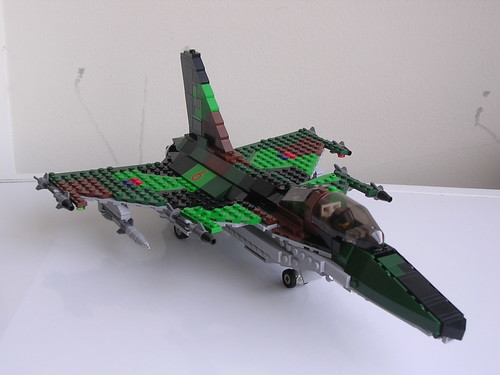
The second step is creating the patches. As I mentioned before, the demarcation lines between different camouflage colours tend to not be straight lines. Of course, LEGO is full of straight lines, but we can break them by applying two simple guidelines (important enough for me to make them stand out a bit):
1)The border between colours should never be a straight line of more than 3 or 4 studs long before it changes direction.
2)once a demarcation line has changed direction once, it should change again at the next stud.
If you don't follow the latter your patches will end up looking far too rectangular. I pondered making a drawing to show this, but have instead decided to show it using a picture of a model I built for the
Alpha Company Forums.
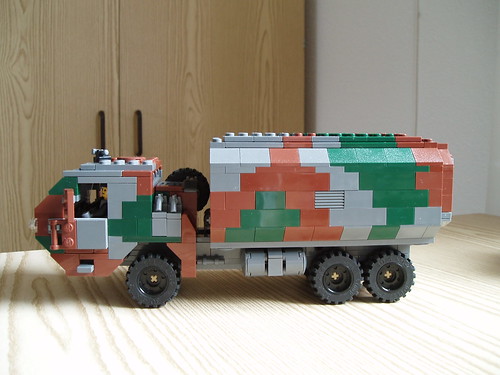
Demarcation lines between different colour should typically not be straight for more than 3 or 4 bricks.
If you look at the demarcation lines between the colours on the side of the container the vehicle carries, you'll see that they follow the two rules above. There is one obvious exception: the long straight line at the bottom, and it stands out like a sore thumb! This is something I need to fix on a new version. These rules may all seem terribly complicated and they could get in the way of finding the right shape or using a particular part that works well in a particular spot. However, I have some practical advice to avoid this. What sometimes works for me is building the model without paying too much attention to the camouflage and then, when the rough form is done, simply swapping some colours around whilst applying the guidelines above. It doesn't have to require vast amounts of parts either.
As examples I'll show some more examples of other people's LEGO models that show what I think is convincing camouflage. Look closely and you'll see that the builders have generally applied the guidelines for the demarcations between the colours, quite possibly without being aware of them.

Tan and dark blueish grey on Brickmania's Tiger tank, with leaves added for extra effect.
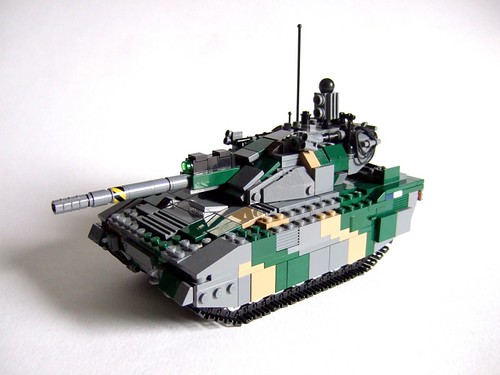
Aleksander SE's "Prowler" Light Tank is a fictional but very convincing vehicle in dark green, dark grey and tan. The tan looks quite light compared to the other colours, but because there's not a whole lot of it looks fine.

Magnus Lauglo uses dark green, regular green and dark grey for his Griffin heavy lift helicopter. The green looks a bit lurid, but combined with the darker colours the scheme is convincing.
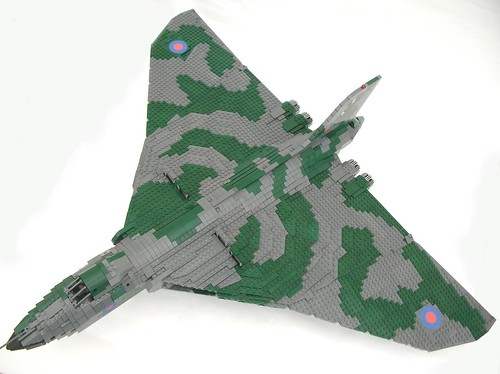
Lego Monster's huge Vulcan bomber has a few fairly long straight lines in the camouflage, but because it's such a huge model this doesn't distract at all. Also note the use of wedge plates to create diagonal lines.
Of course, this overview is far from complete. There are more techniques you can use, with slopes and wedge plates to make things smoother for instance (as on Lego Monster's Vulcan). Some real-world vehicles can have pretty odd-ball patterns. There is also a type of camouflage that is not so much aimed at making a vehicle or plane blend into the background, but that is instead aimed at making it harder for an enemy to spot how far away it is or in which direction it is pointing. An example of this is painting a
false canopy under the cockpit of a jet, making the bottom look more like the top from a distance. This is a completely different ballgame. In any case hope that I've given you some ideas on how to make your camouflage convincing!
Happy building!