One of the reasons why I haven't been blogging much lately and haven't been commenting much on other people's MOCs is that I've been very busy building myself. A few months ago I built a model of an FM-1 Wildcat, a WW-II carrier-based aircraft fighter used by the US Navy.
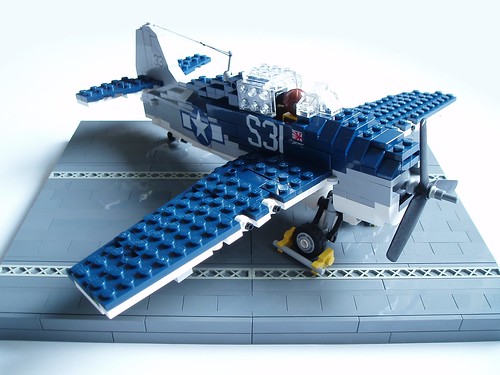
I'd been thinking about building a minifig-scale fighter aircraft for months when I finally built this. The reason why I didn't build one sooner was that I felt that it would be too difficult to add all the features I like, such as a working cockpit canopy and sufficient space to seat a pilot and a retractable undercarriage, on something this small. Part of the reason for building the Wildcat was that like many other US Navy WW-II aircraft, it was powered by a nice and big Radial engines. The main reason why US Navy aircraft had radial engines was because these engines were less prone to overheating when idling on an aircraft carrier deck than the water-cooled engines used in many land-based fighters, such as the Spitfire or P-51 Mustang, which require air to move through their radiators in order to stay cool. The advantage for building LEGO aircraft is that the size of the radial engine means that the aircraft's fuselages are fairly wide and since minifigs are fat this makes finding space for a pilot a lot easier.
Project Intrepid
With the Wildcat I finally had my own little fighter. What I didn't know at the time was that my regular collaborator Ed Diment (a.k.a. Lego Monster) had exciting plans of his own that involved naval aircraft. After having built his amazing model of HMS Hood he had set his sights for something a bit bigger: USS Intrepid, a minifig scale US Navy WW-II aircraft carrier. It's currently still very much a work in progress, but I'm sure I'll be blogging about it more in the future. Just to give you an idea, here's a (trick) picture showing the hulls of HMS Hood and USS Intrepid under construction side-by-side as well as Ed's wife ( Mrs. Monster, obviously).
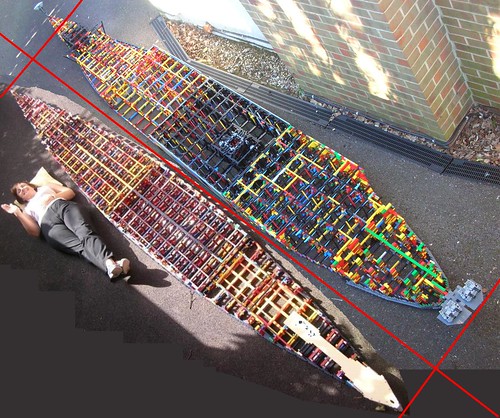
You should also keep in mind that the flight deck is wider and longer than the hull and sits 45 plate widths above the water line. This is a big project! Ed obviously has his hands full building the ship and after having seen my Wildcat, he asked me whether I was willing to design and help build the aircraft for it. I was. I have built a few other things since, but WW-II aircraft building has taken up much of my time spent on LEGO-building ever since. Ed is modelling USS Intrepid as she appeared in early 1945. At that time she carried four types of aircraft: F6F Hellcat and F4U Corsair fighters, SB2C Helldiver dive-bombers and last but not least TBF Avenger torpedo-bombers.
During WW-2 USS Intrepid served in the Pacific fleet. Navy aircraft used over the Pacific used three basic colour schemes. Early in the war most aircraft were pale blue on top (probably best represented by LEGO sand blue) and light grey on the lower surfaces. In 1943 a tri-clour scheme was introduced, with white under-surfaces, dark blue on top and blueish grey on the sides and the tailfin. In late 1944 aircraft started to be painted in dark blue overall. It is very likely that many aircraft aboard Intrepid in 1945 were painted in the latter scheme. Unfortunately the LEGO parts selection in dark blue is very limiting (few invert slopes and hinges, for instance), which makes building an aircraft in dark blue overall a difficult proposition. Since aircraft in the older tri-colour scheme generally weren't repainted and hinges and other special parts are easy to get in white or blueish grey, I decided to build all of the aircraft in this scheme.
TBF Avenger
I decided to start with the Avenger. I've long had a soft spot for this type. It looks ungainly, but was immensely capable. As I wrote a few days ago, I tend to plan building my aircraft and one of the things I look at while planning are what parts I reckon will be difficult. On the Avenger I suspected that the canopy would be tricky as well as the unique wing-fold mechanism.
Building the canopy and gun turret involved some pretty serious compromises. The real aircraft can be crewed by as many as four people, a pilot in the forward cockpit, a radio operator in the aft cockpit, a turret gunner (guess where he sits) and a bombardier in the aft fuselage. In practice the roles of bombardier and radio operator were often done by a single person, but fact of the matter is, I only have space for the pilot on my model -and only with the cockpit canopy open.
Grumman devised a unique wing-folding mechanism called the 'sto-wing' for many of its shipboard aircraft. The outer wing panels swivel such that they end up flanking the aft fuselage. Allegedly the founder of the company, Leroy Grumman, worked out the geometry in his office one day using a paperclip and an eraser. I have built sto wings before, but on the Avenger the mechanism was complicated by the location of the undercarriage (in the wings) and by having to have the mechanism in the wing itself (rather than in an engine nacelle). The same is true of the Wildcat, but its wings are tiny and that means the construction doesn't have to be as sturdy as for the much larger wings of the Avenger. Fortunately, the Avenger's wings are also quite thick and after a few revisions things worked.
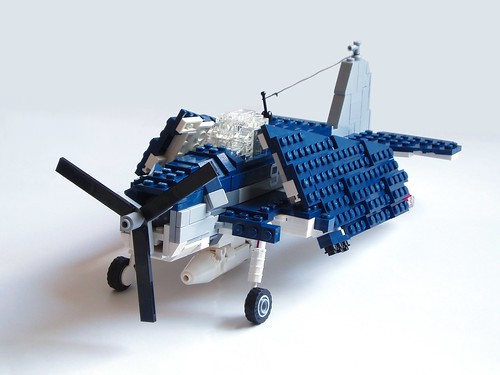
F4U Corsair
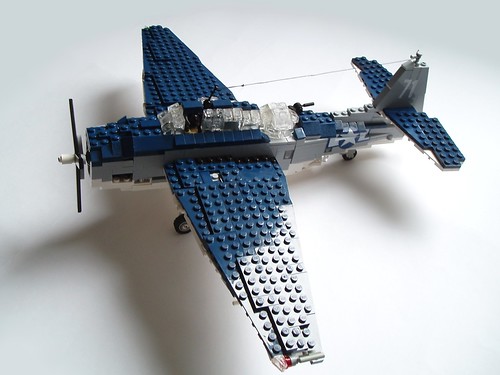
After I finished the Avenger, I turned my attention to the F4U, aka. the 'bent-wing wonder'. Powerful engines require a big propeller. The Corsair's designers came up with an interesting way of making sure that the propeller cleared the deck: rather than giving their plane long undercarriage legs, they had the inboard sections of the wings slope down at an angle and the outboards sections up, with the undercarriage legs attached at the lowest point.

Unsurprisingly, getting this shape right whilst still having enough space for the wheels to retract was the biggest challenge when building this model. Beyond that it was largely trouble-free. the cockpit canopy was a direct copy of the canopy I designed for the Wildcat. I also built a small flight deck tractor and some deck crew to go with it.

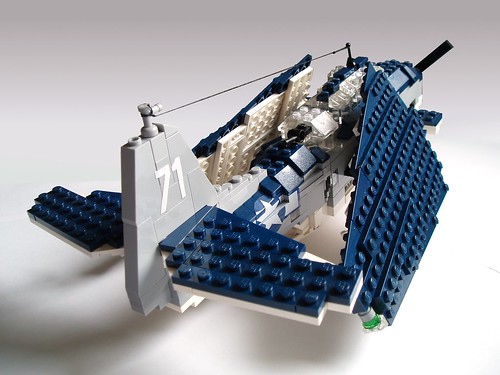
As you can see, the outer wing panels on the Corsair fold up for storage aboard carriers, which was easy to do on my model.
A6M3 Zero-Sen
Ed and I agreed a long time ago that Intrepid wouldn't be complete without at least one Japanese aircraft ready to dive down on it. My biggest question was: which one? After looking at a fair few pictures I decided to build the most famous of them all, a version of the Mitsubishi A6M Zero-Sen, also known simply as the 'Zero' or 'Zeke'.
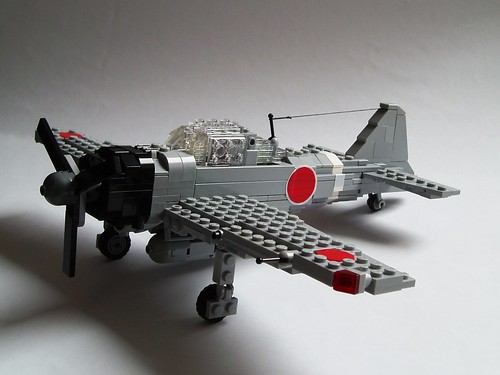
Early and late model Zeros had rounded wing-tips. I chose to build a A6M3, with square wing-tips. The parts that are usually difficult on aircraft models are the undercarriage and the cockpit canopy. The undercarriage is simple; sits in the wings and retracts inwards. The opening cockpit canopy is once again simply a variation on the design I used on the Wildcat. Land-based Zeros were often painted dark green with light grey under-surfaces, but because the parts selection in dark green is even more limited than in dark blue, I chose to build the model in grey, similar to the colour scheme usually worn my Imperial Japanese Navy aircraft flown from aircraft carriers. The build went very smoothly, without any significant difficulties.
SB2C Helldiver
The same cannot be said about building the Helldiver. The real Helldiver had a lot of teething problems when it entered service: it was unstable, unreliable and suffered structural failures. the aircraft was so unpopular at first that it received a number of unflattering nicknames such as 'The Beast' and 'Son of a Bitch, 2nd Class'. I wasn't looking forward to building this model. I think the real-world aircraft looks ungainly and odd and I figured that building one out of LEGo would be problematic. When I started building it I knew there were several difficulties I needed to solve. The Helldiver has two sliding canopies, for instance, and an internal weapons bay smack in the middle of the fuselage where the wings are attached to it. Normally I try to build that area out of several overlapping plates, to give the aircraft sufficient structural strength. This was further complicated by the location of the landing gear in the leading edge of the wing, which meant that there wasn't much room there for structural bits.

The end result is reasonably sturdy although the fuselage can flex a bit and the space inside the weapons bay is a bit smaller than I would have liked. The canopies on my model are of a similar design to the canopy of the Avenger, which unfortunately means that there is no room for crew inside with the canopies shut. Fortunately the wing folding mechanism on the Helldiver is fairly simple, with the end panels simply folding up. However, I did spend a fair bit of time fiddling with the length of the outer wing panels and the location of the hinges to get them to fit properly.
F6F Hellcat
Before I give the erroneous impression that things always go to plan, it's time to introduce the F6F Hellcat, yet another Grumman product. Having built the other aircraft I figured that building the Hellcat would be smooth sailing. I figured that the biggest problem with the Hellcat would be the central section of the wings and fuselage. The Hellcat had a sto-wing, the undercarriage retracts into the wings and the wings sit at an awkward angle. As I was building the aircraft I realised that I was right about identifying the difficult bits. However, the solution that I came up with soon turned into a major pain.
The wings get their slight angle by mounting them to the fuselage using plate hinges. My LEGO version of the sto-wing also uses plate hinges and it seemed like a good idea to use the same set of plate hinges that were used to mount the wings for the sto-wing. A similar idea worked really well on my Fairey Swordfish. Unfortunately it was pretty much a disaster on the Hellcat because the position of the landing gear sits close to the hinge point of the wing. The wing didn't fit properly, leaving awkward gaps at the leading and trailing edges. It also sat at the wrong angle, when folded the aircraft was too wide and the landing gear itself also didn't work well. It frequently collapsed and the landing gear struts were too long. The rest of the aircraft was fine, but the whole thing was let down by the wing and undercarriage construction.
Ultimately I decided that the only thing I could do was to completely rebuild the wing centre section, with the actual wing connected to the fuselage with plate hinges and the outer section of the wings connected to the inner section with more plate hinges. It may sound like a wobbly construction, but it solved all the problems in one go, as it also gave me enough space to fix the landing gear.
All together now
After I completed the F6F, all four aircraft types for the air wing are done.
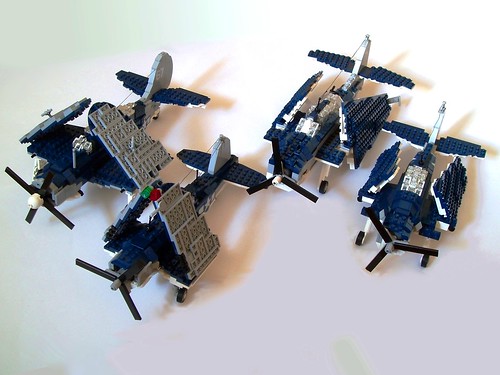
What is next is building them in larger quantities. Ed has already started building copies of the Avenger, which you can see here aboard a section of Intrepid that is still under construction. Together with my prototype, we have already got six of them.

We are thinking of the following numbers of aircraft
- 6 TBF Avengers (already completed)
- 6 F6F Hellcats
- 9 SB2C Helldivers
- 15+ F4U Corsairs
Obviously that still means a lot of work in the next months. It is likely that Ed and I will build copies of the Hellcats, much as we did with the Avengers. For the Corsair, however, I intend to make instructions. I will probably be sharing them with other users, which means that if any of you feel like having your own Corsair, in a few months time you will be able to build your own copy of my design.
Happy building!
That's going to be one of the best LEGO aircraft carrier ever! Of course Harry S. Truman's aircraft carrier is impressive, but the aircrafts (for example) need to be more detailed and realistic. And I think it will be the case here.
ReplyDeleteJust an idea, Lego Monster can also make the "evolution" of the boat. I mean, with modernisation, the hull being made, I think it wouldn't be too much work (exept for the aircrafts) and it could still be fun!
Ezechielle/Imagelego
Ralph, watching this project come together is truly inspirational. Thanks for your detailed explanation of the different airplanes - I can't believe you are building so many of these!
ReplyDeleteMagnus
Thanks for the comments guys.
ReplyDeleteLego Monster has already discussed the idea of gradually updating the model in the next few years to represent the updates that the real ship underwent. Intrepid was operational for a very long time -even in Vietnam, when the ship operated A-4 Skyhawks and F8 Crusaders, among other planes. Of course, Lego Monster will first have to finish version 1, and that will still take a lot of effort.
It is probably doable, but I'm still not quite convinced that we aren't biting off more than we can chew when it comes to building the aircraft. These numbers are actually down from the numbers we wanted when we started this. Towards the end of the war Essex class carriers had more than 100 aircraft.
Wow. Is there a link to more photos of the aircraft? I like your approach to the canopy design.
ReplyDeletedo you think you can make instuctions for the hellcat? i really have a love for that plane but i never can get a design for it right.
ReplyDeleteThis is great information for me. I was looking for it from long time. Thanks for sharing. about you posted. you made a great job for this and thank you for sharing your taught
ReplyDelete????????????????????? how long did it take to make that boat?!!!
ReplyDelete